Speed Text Effect
In this Photoshop Tutorial we will show you give your type a nice feeling of speed.
Step One: Open a new document, make the background black and type your letters in white. Now press Ctrl+E to reduce the layers to the background.
Step Two: Now go filters> Blur> Gaussian Blur and set it between 1.0 an 1.5.

Step Three: Next we need Filters> Stylize> Solarize. Your text looks like this!

Step Four: Then use image => Adjustment => Channel Mixer and set the values like below.
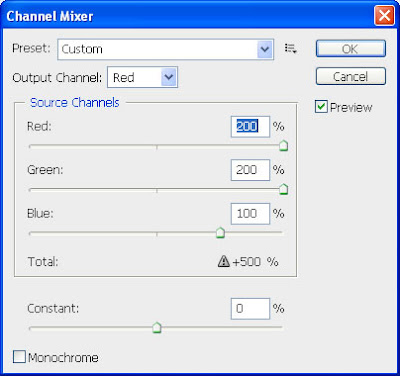
After putting the values in Channel Mixer, your text looks like!

Step Five: Now go Filters> Distort > Polar Coordinates and choose the lower -Polar to Rectangular- radio button.

Step Six: Now go to Image> Rotate Canvas> 90°CCW. Next we apply Filters> Stylize> Wind - from left -you may use it two times; depending on your image size.

Step Seven: Then go to image-rotate canvas 90°CW. Now go again Filters> Distort> Polar Coordinates and this time choose the upper -Rectangular to Polar- radio button. And Your Speed Type Text Looks like a great effect!

10 Comments:
wow, smart work
By Ismail, At
March 31, 2009 at 1:40 AM
Very nice aproach to do this effect
By Anonymous, At
April 18, 2009 at 4:41 PM
simple, but wooow...keep rock n roll dudu's :)
By Anonymous, At
April 22, 2009 at 12:06 AM
ang galing naman. you are a great artist. i love your work.
By Anonymous, At
May 11, 2009 at 1:14 PM
Grabe.....Galing naman.....More power to you.....
misc of philippines
By misc, At
June 12, 2009 at 10:58 PM
Great tutorial! I found a site if you want to post your tutorials http://tutorials.extremestudio.ro/
By Anonymous, At
July 16, 2009 at 2:27 PM
Nice step by step tutorial to get the text speed effects.
By Typing Touch, At
July 17, 2010 at 12:38 PM
Such a nice tutorial, very easy and very good to understand. I was confused with the background fill because in Photoshop CS you can not bucket fill the background.
By Web Design, At
July 31, 2010 at 8:34 AM
I am sure that following these steps and practicing will make you reach at least 50 wpm of typing speed
By typing speed test, At
September 21, 2010 at 4:31 AM
Excellent tutorial it's help me to make better Clipping path service
By Unknown, At
March 15, 2017 at 3:43 AM
Post a Comment
<< Home