Convert your photos into a glamorous effect.
Step 2: Duplicate the layer by pressing Ctrl+J. Set the duplicated layer blending mode to 'Soft Light'.
Step 3: Now go to Filter> Blur> Gaussian Blur and apply these following setting:
Step 4: Press 'D' to reset your color palette.
Go to Image> Adjustments> Hue/Saturation or press Ctrl+U and apply these settings:
Step 5: Merge the layers together by pressing Ctrl+E.
Now duplicate the layer, and set the duplicated layer blending mode to 'Screen'.
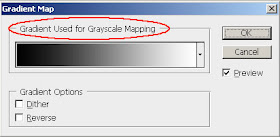
Step 6: Go to Layer> New Adjustment Layer> Gradient Map and change the mode to 'Lighten'.
After click OK Gradient Map Box open, select Grayscale Mapping and click on OK.

Here's the final result!


3 comments:
great
Very cool Glamorous Effect . thanks
Image Masking Service | Clipping Path Service
clipping path | Photo Cut Out
This effect is really so beautiful. Thanks for giving us the tutorial.
Raster To vector/clipping path service/Background Removal
Post a Comment