Thermal Photo Effect
Learn how to convert your photos into Thermal Photo Effect.
Step 1: First open any image.

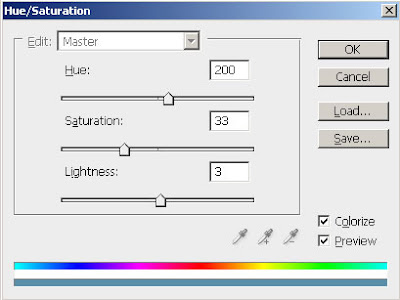
Step 2: First we apply Hue/Saturation, go to Image> Adjustments> Hue/Saturation or press Ctrl+U and apply these following setting:
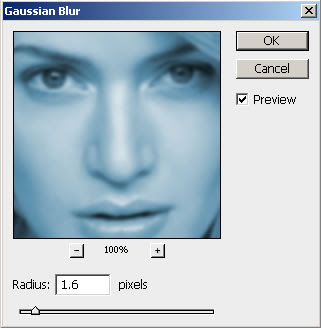
Step 3: Duplicate the layer by pressing Ctrl+J and go to Filter> Blur> Gaussian Blur and apply these settings:
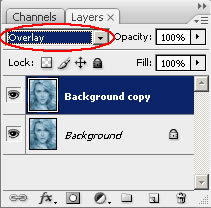
Step 4: Set the layer blending mode to 'Overlay'.
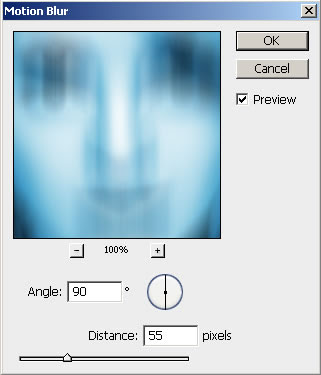
Step 5: Merge the layers together by pressing Ctrl+E. Again duplicate the layer and go to Filter> Blur> Motion Blur and apply these following setting:
Step 6: Set the layer blending mode to 'Overlay' and merge the layer together.
After this your Image looks like this:
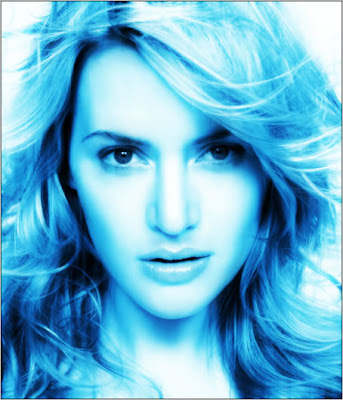
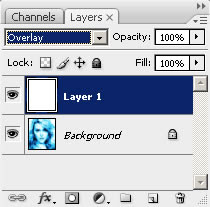
Step 7: Create a new layer and fill with white using Paint Bucket Tool.
Set this layer mode to 'Overlay' and do not merge.
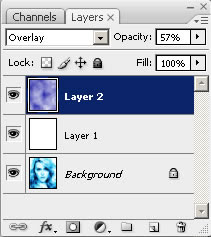
Step 8: Press 'D' to reset your color palette. Set your foreground color to #000099 and background to white. Create a new layer and fill with this color (#000099).

Step 9: Go to Filter> Render> Clouds. Set the layer blending mode to 'Overlay' and Opacity on this layer to 57%.
Step 10: In this step create a new layer again and fill it with white. Set the layer blending mode on this layer to 'Difference'.
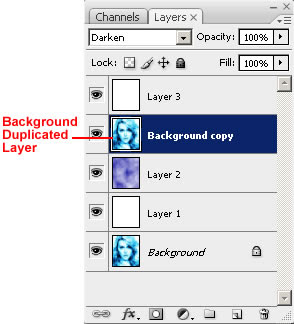
Step 11: In the Final step duplicate your background layer. Move this layer to 2nd from the top under white layer and set the layer blending mode to 'Darken'.
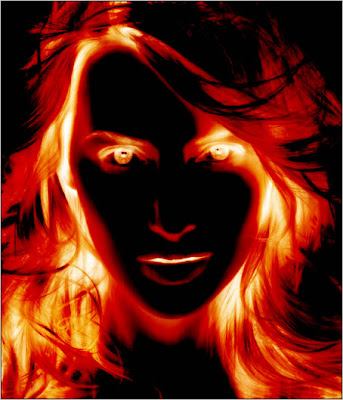
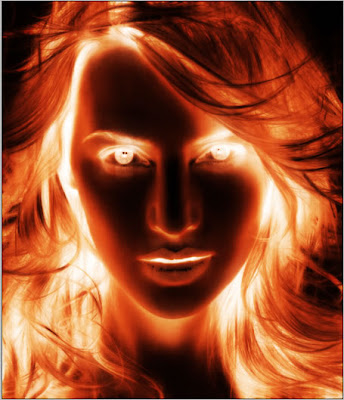
Here's is the Final Result!:
Step 1: First open any image.

Step 2: First we apply Hue/Saturation, go to Image> Adjustments> Hue/Saturation or press Ctrl+U and apply these following setting:

Step 3: Duplicate the layer by pressing Ctrl+J and go to Filter> Blur> Gaussian Blur and apply these settings:

Step 4: Set the layer blending mode to 'Overlay'.

Step 5: Merge the layers together by pressing Ctrl+E. Again duplicate the layer and go to Filter> Blur> Motion Blur and apply these following setting:

Step 6: Set the layer blending mode to 'Overlay' and merge the layer together.
After this your Image looks like this:

Step 7: Create a new layer and fill with white using Paint Bucket Tool.
Set this layer mode to 'Overlay' and do not merge.

Step 8: Press 'D' to reset your color palette. Set your foreground color to #000099 and background to white. Create a new layer and fill with this color (#000099).

Step 9: Go to Filter> Render> Clouds. Set the layer blending mode to 'Overlay' and Opacity on this layer to 57%.

Step 10: In this step create a new layer again and fill it with white. Set the layer blending mode on this layer to 'Difference'.

Step 11: In the Final step duplicate your background layer. Move this layer to 2nd from the top under white layer and set the layer blending mode to 'Darken'.

Here's is the Final Result!:

183 Comments:
How i can download this photoshop?
By Anonymous, At
April 16, 2009 at 4:47 AM
Anonymous, At
April 16, 2009 at 4:47 AM
great effect! and the end result is cool but for me it keeps coming out orange face and white hair instead of black face orange hair. any ideas?
By Nolo, At
April 16, 2009 at 5:00 AM
Nolo, At
April 16, 2009 at 5:00 AM
invers some stuff here an there, then play with hue saturation
By Anonymous, At
April 16, 2009 at 5:31 AM
Anonymous, At
April 16, 2009 at 5:31 AM
nice effect. Thanks for sharing
By prashant, At
April 16, 2009 at 10:59 AM
prashant, At
April 16, 2009 at 10:59 AM
to merge these, start at bottom of image series and work up. Very good tutorial!
By Anonymous, At
April 16, 2009 at 5:48 PM
Anonymous, At
April 16, 2009 at 5:48 PM
Awesome simple tutorial work great
By Anonymous, At
April 17, 2009 at 1:47 AM
Anonymous, At
April 17, 2009 at 1:47 AM
Good tutorial! I will make a link to from my blog. http://ffrederick.blogspot.com
By Polo, At
April 17, 2009 at 3:27 PM
Polo, At
April 17, 2009 at 3:27 PM
Could you tell what is the image size you start with, please. Love the effect. It seems to work best with blond hair
By Anonymous, At
April 17, 2009 at 7:25 PM
Anonymous, At
April 17, 2009 at 7:25 PM
A good bit of photo retouching. I will certainly mention this post to my students.
By photo retouching, At
May 2, 2009 at 11:26 PM
photo retouching, At
May 2, 2009 at 11:26 PM
this works for fair skinned blonde hair, how about one for darken skinned, brunettes? playing with hue / saturation is tough when its the first thing that needs to be done.. :(
By Anonymous, At
May 6, 2009 at 6:50 AM
Anonymous, At
May 6, 2009 at 6:50 AM
Great bit of information. Thanks for sharing.
By image manipulation, At
May 7, 2009 at 11:18 PM
image manipulation, At
May 7, 2009 at 11:18 PM
Nolo:
that's probably b/c you have black hair and darker skin tone
By varuas, At
May 16, 2009 at 10:38 AM
varuas, At
May 16, 2009 at 10:38 AM
Hi there! Nice tutorials? Thanks for sharing and posting it here. I was looking for more precise work like retouching a picture, removing unwanted materials, using patch for an area, making a small size picture a big size without compromising on the quality and so on. Please add some more. thanks
By Anonymous, At
July 5, 2009 at 6:44 PM
Anonymous, At
July 5, 2009 at 6:44 PM
everytime i wanne use the blur motion tool my PS chrashes anybody any idea how to solve it ?
or a other way to gett the final work without using blur motion ?
By masxter, At
July 14, 2009 at 9:45 AM
masxter, At
July 14, 2009 at 9:45 AM
layer 1 and layer 2 doesn't have any effect. just my observation. :D
By Anonymous, At
July 29, 2009 at 1:59 AM
Anonymous, At
July 29, 2009 at 1:59 AM
Thanks! BTW you don't need photoshop to do this. just down load GIMP for free!
By Jerry W., At
August 15, 2009 at 7:26 AM
Jerry W., At
August 15, 2009 at 7:26 AM
Wich program/photoshop you used?!! Plz, tell me...
By Fernando, At
September 22, 2009 at 11:13 AM
Fernando, At
September 22, 2009 at 11:13 AM
Use Adobe Photoshop CS3
By Anonymous, At
September 22, 2009 at 12:00 PM
Anonymous, At
September 22, 2009 at 12:00 PM
wow.. great! thanksz
By Anonymous, At
November 22, 2009 at 3:48 AM
Anonymous, At
November 22, 2009 at 3:48 AM
great and easy to do thanks
By Anonymous, At
January 16, 2010 at 6:22 AM
Anonymous, At
January 16, 2010 at 6:22 AM
Really the best tutorial thermal photo effect.
By Vanessa, At
February 20, 2010 at 12:57 AM
Vanessa, At
February 20, 2010 at 12:57 AM
This comment has been removed by the author.
By Tin Man, At
March 27, 2010 at 4:15 PM
Tin Man, At
March 27, 2010 at 4:15 PM
Great Tutorial easy to follow!
By Tin Man, At
March 27, 2010 at 5:06 PM
Tin Man, At
March 27, 2010 at 5:06 PM
when you're complete,
merge the bottom 3 layers and toggle to visibility to see if it makes any difference, and it doesn't seem to do anything.
So it seems that steps 7,8, and 9 don't have an effect in the final image.
By Tin Man, At
March 27, 2010 at 5:15 PM
Tin Man, At
March 27, 2010 at 5:15 PM
The version of photoshop that i got will only let me go up to 180. So what do i do just use that number?
By Anonymous, At
May 13, 2010 at 9:53 AM
Anonymous, At
May 13, 2010 at 9:53 AM
That is great! and it so easy
By Anonymous, At
June 13, 2010 at 6:11 AM
Anonymous, At
June 13, 2010 at 6:11 AM
Good one !!!!!
By Anonymous, At
June 17, 2010 at 1:59 AM
Anonymous, At
June 17, 2010 at 1:59 AM
For everyone who wants photo retouching service of themselves should google for such a service online.
By Anonymous, At
June 24, 2010 at 11:12 AM
Anonymous, At
June 24, 2010 at 11:12 AM
@ anonymous - its not letin u go beyond 180 cause u havent clicked on colorize in the hue window
By Da Duke, At
March 27, 2011 at 9:28 AM
Da Duke, At
March 27, 2011 at 9:28 AM
Good post. Very impressive.Thanks for sharing.
By cheap android tablet, At
July 27, 2011 at 8:29 AM
cheap android tablet, At
July 27, 2011 at 8:29 AM
so cool . so good
what a nice effect Huh!
By Unknown, At
August 29, 2011 at 4:42 AM
Unknown, At
August 29, 2011 at 4:42 AM
All I can say is that I am very grateful for the professional guide to this short simple and this crazy effect thanks thanks and thanks again
By Liran, At
January 6, 2012 at 3:09 AM
Liran, At
January 6, 2012 at 3:09 AM
Awesome photoshop effects. Thsnks for sharing.Best Indian web Hosting
By Best Hostings, At
January 16, 2012 at 10:37 PM
Best Hostings, At
January 16, 2012 at 10:37 PM
i like trainz
By Anonymous, At
February 1, 2012 at 7:22 AM
Anonymous, At
February 1, 2012 at 7:22 AM
This is the perfect blog for anyone who wants to know about this topic.
photo retouches
By Groupdmt, At
April 25, 2012 at 10:57 PM
Groupdmt, At
April 25, 2012 at 10:57 PM
i like this tuter very much
web aegis
By webaegis, At
June 4, 2012 at 4:06 AM
webaegis, At
June 4, 2012 at 4:06 AM
VERY GOOD TUTORIAL AND TUTOR
By Unknown, At
October 7, 2013 at 12:48 PM
Unknown, At
October 7, 2013 at 12:48 PM
what software is used?., mine is cs3 and wont work...
By Anonymous, At
November 4, 2013 at 1:59 AM
Anonymous, At
November 4, 2013 at 1:59 AM
You have done such an amazing job on this series. I envy your sewing skills and your patience and your diligence. If anyone ever asks me how to sew, I'm sending them to your blog and this series. Congratulations on such an extensive, well thought out and clearly presented set of this Photoshop tutorial.
By Clipping Path Service, At
March 26, 2015 at 7:09 AM
Clipping Path Service, At
March 26, 2015 at 7:09 AM
Really excellent job :) Glad to see this tutorial. That gonna help me to make myself better designer than yesterday :)
Regards,
Edd.
Designer@ Background Removal Service | Clipping Path | Neck Joint Service | Image Masking Service | Color Correction Service | Background Removing Service | Photo Retouching Services | Background Remover
By Ashley, At
March 26, 2015 at 7:12 AM
Ashley, At
March 26, 2015 at 7:12 AM
This is the exact one I was looking for. Thank you for sharing. clipping path
clipping path service | Remove Background | Photo Retouching | Image Masking | Ghost Mannequin Service
By George, At
August 28, 2015 at 12:52 PM
George, At
August 28, 2015 at 12:52 PM
Such a great tutorial that is. really awesome work.
Offshore Clipping Path |Clipping Creations India
By Unknown, At
April 26, 2016 at 8:11 AM
Unknown, At
April 26, 2016 at 8:11 AM
Very good photoshop tutorial and easy to learn. thanks for step by step details
By Clipping Path, At
May 11, 2016 at 2:31 PM
Clipping Path, At
May 11, 2016 at 2:31 PM
Nice and helpful tutorial here and thanks for sharing with us
Clipping path
Image Masking Service
Remove Background service
By Image Masking, At
May 11, 2016 at 2:34 PM
Image Masking, At
May 11, 2016 at 2:34 PM
I have learn lots form you tutorial . keep it up
Remove White Background
Image Masking Service
Photo Retouching Service
By white background, At
May 11, 2016 at 2:35 PM
white background, At
May 11, 2016 at 2:35 PM
I have really benefited. For a long time I was looking for this kind of article. In this article, I learned a lot.
By clipping path service, At
November 16, 2016 at 12:05 AM
clipping path service, At
November 16, 2016 at 12:05 AM
clipping path service
background remove
By Unknown, At
May 7, 2017 at 3:38 AM
Unknown, At
May 7, 2017 at 3:38 AM
nice
By Beauty, At
May 16, 2017 at 1:36 AM
Beauty, At
May 16, 2017 at 1:36 AM
Hi admin, It is really helpful post. i think i will increase my Photoshop knowledge.
Ghost Mannequin Service Ghost Mannequin Service
By Ghost Mannequin Service, At
May 16, 2017 at 1:38 AM
Ghost Mannequin Service, At
May 16, 2017 at 1:38 AM
Is is a professional and expert Photo editing and image retouching graphic design agency offers photo touch up service and ghost mannequin effcet
By Color Cube Graphics, At
June 17, 2017 at 1:55 AM
Color Cube Graphics, At
June 17, 2017 at 1:55 AM
Thank you very much for post the article. Really, it's very good. I have learnt a lot about this. I'll try to apply your ideas and tips.
By Background Removal Services, At
April 30, 2018 at 7:56 AM
Background Removal Services, At
April 30, 2018 at 7:56 AM
Background Removal Services (BRS) is one of the best Clipping path service provider around the world. We offer our global customers: Raster to Vector Services, Photo Restoration Services Prices, Photo Neck Joint Service, Exposure Color Correction Service, Jewelry Photo, Retouching Services, Photo Color Correction Service, Image Mirror Effect Service, Cheap Retouching Services, Deep Etching Service, Photo Background Removal Service.
By Background Removal Services, At
April 30, 2018 at 8:13 AM
Background Removal Services, At
April 30, 2018 at 8:13 AM
This is really good one.
By Anonymous, At
May 2, 2018 at 2:09 AM
Anonymous, At
May 2, 2018 at 2:09 AM
Great tutorial. I am going to use your suggestion. Thanks for sharing
By Robert Smith, At
May 3, 2018 at 3:22 AM
Robert Smith, At
May 3, 2018 at 3:22 AM
thank you for sharing this best helpful tutorial,
Visit our clipping path service
By miraz, At
August 6, 2018 at 12:39 AM
miraz, At
August 6, 2018 at 12:39 AM
This photo retouching is absolutely amazing. It is really useful and informative and fun for beginner graphic designer. thanks for sharing.
By Photo Editing, At
August 9, 2018 at 5:47 AM
Photo Editing, At
August 9, 2018 at 5:47 AM
Well post you have appropriated on open. Like read your blog. So magnificent Thank you individual.
Clipping Path Service |
Clipping Path NYC | clipping path service in Usa | Ghost Mannequin Service | remove image background |
Background Remove Photo
By Clipping Path India, At
September 27, 2018 at 11:55 AM
Clipping Path India, At
September 27, 2018 at 11:55 AM
I like this photoshop effects. Photoshop is main software to make photo editing. I love very much Clipping Photo Editing Service
By clipping photo editing service, At
October 14, 2018 at 9:35 PM
clipping photo editing service, At
October 14, 2018 at 9:35 PM
Great tutorials. It's very very helpful for me. Thanks for sharing.
clipping path service
By Anonymous, At
November 9, 2018 at 10:11 PM
Anonymous, At
November 9, 2018 at 10:11 PM
This comment has been removed by the author.
By Anonymous, At
November 14, 2018 at 10:51 PM
Anonymous, At
November 14, 2018 at 10:51 PM
Nice step by step tutorial
By Rustam, At
November 26, 2018 at 5:14 AM
Rustam, At
November 26, 2018 at 5:14 AM
So helpful tutorial.
clipping path
By Unknown, At
November 28, 2018 at 2:31 AM
Unknown, At
November 28, 2018 at 2:31 AM
This blog is helpful for me. I have found a lot of things.
clipping path
By Clipping Path, At
December 5, 2018 at 10:45 PM
Clipping Path, At
December 5, 2018 at 10:45 PM
Nearly every graphic designer has used Photoshop tutorials to bolster their design skills; in fact, theres perhaps no better way to become a better graphic designer than to follow Photoshop tutorials. This is an extremely awesome tutorial.
By Color correction tutorial, At
December 19, 2018 at 12:52 AM
Color correction tutorial, At
December 19, 2018 at 12:52 AM
I am delighted to present to the Broadcast and Advertising industry the All India Ratings. We have been able to give to the country a view of “What India Watches” as promised,” said BARC India CEO Partho Dasgupta.
Watch More TV Serial- All TV Serial, TV Serial Today, Daily TV Serials, Mega TV Serial, Desi Serial Online, Live TV Link
By Yakub Ali, At
January 12, 2019 at 7:12 AM
Yakub Ali, At
January 12, 2019 at 7:12 AM
I am delighted to see the post here. The post is informative and useful for me. Thanks for your king information. Keep it up.
Clipping Path | Image Masking | Photo Retouching | Photo Manipulation
By Olivia Lily, At
February 6, 2019 at 9:08 PM
Olivia Lily, At
February 6, 2019 at 9:08 PM
Useful information. Lucky me I discovered your website accidentally, and I am stunned why this twist of fate did not happened in advance!
I bookmarked it.
obat fistula ani paling ampuh
obat benjolan di selangkangan
obat penghancur batu ginjal
By Jisoo Blackpink, At
February 8, 2019 at 10:33 PM
Jisoo Blackpink, At
February 8, 2019 at 10:33 PM
The workflow you have shared is great and worthful. you can also visit on the below link to get background removal service.
background remove service
By Andrew, At
February 11, 2019 at 11:20 AM
Andrew, At
February 11, 2019 at 11:20 AM
Great piece of content. This is really very useful for me. The amazing topic you described here. The writing style is very impressive and easy to understand. I usually find such a good content. I never comment on any article but this one something different. I can't stop to comment myself. last time I read some good post at times era .Here i am sharing some posts which completely very amazing.
By James Morgan, At
February 21, 2019 at 2:04 AM
James Morgan, At
February 21, 2019 at 2:04 AM
We are really grateful for your blog post. You will find a lot of approaches after visiting your post. I was exactly searching for. Thanks for such post and please keep it up. Great work. Clipping Mask Service
Clipping Mask Service
Clipping Mask Service
By John Smith, At
February 21, 2019 at 2:19 AM
John Smith, At
February 21, 2019 at 2:19 AM
This comment has been removed by the author.
By online gifts service, At
March 5, 2019 at 10:56 PM
online gifts service, At
March 5, 2019 at 10:56 PM
nice this post...........
By Adam Smith, At
March 11, 2019 at 2:52 AM
Adam Smith, At
March 11, 2019 at 2:52 AM
Nice this post...........Thanks for sharing views
By Joy Shawn, At
March 17, 2019 at 9:59 PM
Joy Shawn, At
March 17, 2019 at 9:59 PM
This is a very great post and the way you express your all post details that is too good. Thanks for sharing with us this useful post :
cara mengatasi sembelit pada ibu hamil
obat penurun leukosit tinggi
cara mengobati kanker usus besar
cara mengobati cacar air
cara pemesanan qnc jelly gamat
pengobatan cacar air alami
manfaat sari kurma untuk kesehatan dan ibu hamil
By Syakira Khumaira Azzahra, At
March 18, 2019 at 8:40 PM
Syakira Khumaira Azzahra, At
March 18, 2019 at 8:40 PM
Thanks for sharing this information. It is very nice Article.. Clipping Expert Asia Provides best image masking and more other services..
By Image Masking Service, At
March 22, 2019 at 2:01 AM
Image Masking Service, At
March 22, 2019 at 2:01 AM
It is very interesting and excellent Photoshop tutorial....
By Image Masking Service, At
March 22, 2019 at 3:15 AM
Image Masking Service, At
March 22, 2019 at 3:15 AM
nice tutorial. Thanks for sharing this tutor.
clipping path service
By Anonymous, At
March 24, 2019 at 11:39 PM
Anonymous, At
March 24, 2019 at 11:39 PM
This is really very useful post.Thanks for sharing this very helpful post here with us.
By http://prophotoshopexpert.com, At
March 28, 2019 at 12:35 AM
http://prophotoshopexpert.com, At
March 28, 2019 at 12:35 AM
This is really very useful post.Thanks for sharing this very helpful post here with us.
By http://prophotoshopexpert.com, At
March 28, 2019 at 12:37 AM
http://prophotoshopexpert.com, At
March 28, 2019 at 12:37 AM
Avast customer service
mcafee customer service
Norton phone number
yahoo email support phone number
Mozilla Firefox Phone number
By Sophia, At
April 8, 2019 at 2:39 AM
Sophia, At
April 8, 2019 at 2:39 AM
This is really very useful post.Thanks for sharing this very helpful post here with us.
https://prophotoshopexpert.com/
By http://prophotoshopexpert.com, At
April 10, 2019 at 6:29 AM
http://prophotoshopexpert.com, At
April 10, 2019 at 6:29 AM
I really enjoyed your blog Thanks for sharing such an informative post.
Clipping Path Service
Neck Joint Service
Car Photo Editing
Service
By Clipping Path Service India, At
April 19, 2019 at 4:39 PM
Clipping Path Service India, At
April 19, 2019 at 4:39 PM
Thanks for the post and sharing the blog. Valuable and excellent post.
Car Pic
Editing Service
Dealer
Logo Add & Car Background Replacement
By Car Pic Editing Service, At
April 19, 2019 at 4:45 PM
Car Pic Editing Service, At
April 19, 2019 at 4:45 PM
This is a most important blog and it’s very helpful for us. Thanks for sharing .
Deep Etching Service
By Clipping Path.Com.De, At
April 19, 2019 at 4:49 PM
Clipping Path.Com.De, At
April 19, 2019 at 4:49 PM
This comment has been removed by the author.
By Imagescutout, At
June 26, 2019 at 3:15 AM
Imagescutout, At
June 26, 2019 at 3:15 AM
Hi, Very good article on Thermal Photo Effect,
Thanks for sharing, keep up the good work.
By Imagescutout, At
June 26, 2019 at 6:23 AM
Imagescutout, At
June 26, 2019 at 6:23 AM
Thank You so much for this awesome guidelines. This tutorial is really helpful to make thermal photo effect. Thanks for sharing. Check our background removal service.
By Nancy Diese, At
July 5, 2019 at 2:18 AM
Nancy Diese, At
July 5, 2019 at 2:18 AM
Pretty! This was an incredibly wonderful article. Thank you for supplying this information.
By Design Xpertt, At
July 8, 2019 at 2:41 AM
Design Xpertt, At
July 8, 2019 at 2:41 AM
It is very good effect of photo editing service.Thanks for sharing it .We provide the best photo editing service.To know more visit our site.
By Kishor Kumar, At
August 2, 2019 at 11:11 AM
Kishor Kumar, At
August 2, 2019 at 11:11 AM
The theory is very much a post which is very helpful.
By Design Service Asia, At
September 17, 2019 at 10:43 PM
Design Service Asia, At
September 17, 2019 at 10:43 PM
Nice post. This tutorial is very useful and informative for us. Thanks for sharing this with us and you can also check our website to get more information about the clipping path and clipping path service.
By Lilly Ann, At
September 30, 2019 at 10:45 PM
Lilly Ann, At
September 30, 2019 at 10:45 PM
A good bit of photo recovery. I must mention this post to my students. Do you like ghost manipulation service
By Clipping Path Service, At
October 3, 2019 at 11:50 PM
Clipping Path Service, At
October 3, 2019 at 11:50 PM
Really great article. Thanks for taking the time to explain things in such great detail in a way that is easy to understand.
By Photo Retouching Services, At
October 17, 2019 at 7:09 PM
Photo Retouching Services, At
October 17, 2019 at 7:09 PM
Thank you for your sharing time . Its good
By clippingpathqualityassurance, At
October 21, 2019 at 7:59 AM
clippingpathqualityassurance, At
October 21, 2019 at 7:59 AM
Really it was amazing post. Thank you for sharing with us.
eCommerce photo editing services |
professional photo retouching services |
real-estate photo editing services
By Alex, At
November 9, 2019 at 4:00 AM
Alex, At
November 9, 2019 at 4:00 AM
That was a great and comprehensive article…all the tips enumerated and explained will be helpful for those who are wise enough to tap from it. Any business nowadays without social media signals and presence may not make it to the outermost, and investment too is part of the key to success in business. Keep up the good work
By http://www.designercountry.com/, At
November 23, 2019 at 9:20 AM
http://www.designercountry.com/, At
November 23, 2019 at 9:20 AM
Great important post, where you make the main focus, really makes me happy for its necessary of importance. ............
By http://www.designercountry.com/, At
November 26, 2019 at 10:36 AM
http://www.designercountry.com/, At
November 26, 2019 at 10:36 AM
If you are new user to sage 50 accounting software and looking for the sage 50 technical support.If yes than you have come to right place as we provide efficient technical support service to customers who show complete faith in us. With our efficient and highly qualified team ,we never disappoint our customers.You can reach us at 1800-910-4754 at any hour of the day. You can also visit our website at https://www.geekaccounting247.com/ for the complete knowledge of the sage products and services.
The Services we offered are following-
Sage 50 Technical Support Number
Sage 100 Technical Support Number
Sage 50 live chat
Sage 50 Technical Support phone Number
Sage 50 customer service number
Sage 50 payroll support number
Sage 50 support phone number
By Sage 50 and QuickBooks Support, At
December 3, 2019 at 4:52 AM
Sage 50 and QuickBooks Support, At
December 3, 2019 at 4:52 AM
Nice Tutorial. Great effects. For any effects creation and photo editing service, you may contact also orbit graphics ltd. we provide any type of photo editing service. Our popular service includes
Photoshop Image Masking
Background Removal Service
Image Retouching Service
Color Correction Service
By Orbit Graphics, At
December 20, 2019 at 12:28 AM
Orbit Graphics, At
December 20, 2019 at 12:28 AM
A great article you wrote, very helpful for Photoshop learner.To convert photos into thermal Photo effect, what may be the better rating for Hue/Saturation? Let me know. Your given selection is ok? Thank you. Clipping Path Online have quality editor, user can get their services. Recommended.
By Humawan Kabir, At
January 2, 2020 at 6:05 AM
Humawan Kabir, At
January 2, 2020 at 6:05 AM
The tutorial of the thermal photo is really good. The 11 steps that you have explained makes the whole tutorial to understand easily. Also, you have described every steps very well. I have tried to make a thermal effect on my photo by following your tutorial. It was not that hard to make it done. Thank you so much for sharing this amazing tutorial with us. Hope you will find interesting my site is background removal service
By background remove, At
January 5, 2020 at 4:40 AM
background remove, At
January 5, 2020 at 4:40 AM
Nice post. Thanks for sharing.
Visit our web: https://www.orbitgraphics.com/background-remove/
By William, At
January 7, 2020 at 10:51 PM
William, At
January 7, 2020 at 10:51 PM
I am very grateful you did share your knowledge here. It is an excellent post.
Ghost Mannequin services
By David Millar, At
January 7, 2020 at 11:48 PM
David Millar, At
January 7, 2020 at 11:48 PM
Really it is an amazing blog. I learn many important thing by this blog. Thanks for sharing.
Feel free to visit my website:Clipping Path Service
This may help you to find something useful.
By Kamruzzaman Babu, At
January 16, 2020 at 3:27 PM
Kamruzzaman Babu, At
January 16, 2020 at 3:27 PM
If you are new user to sage 50 accounting software and looking for the sage 50 technical support.If yes than you have come to right place as we provide efficient technical support service to customers who show complete faith in us. With our efficient and highly qualified team ,we never disappoint our customers.You can reach us at 1800-961-4623 at any hour of the day. You can also visit our website at https://www.helplinenumber.support/ for the complete knowledge of the sage products and services.
Sage 50 Live Chat Support
Sage 50 Customer Service Number
Sage 50 Support Phone Number
Sage 50 Technical Support Phone Number
xxxxxx
By Sage 50 and QuickBooks Support, At
January 20, 2020 at 4:24 AM
Sage 50 and QuickBooks Support, At
January 20, 2020 at 4:24 AM
Soma pill is a very effective painkiller which basically works as a centrally acting muscle relaxant. This painkiller is very effective in treating the acute pain that we mostly get from injuries. Soma pill works by blocking the ways of perceiving pain between the nerves and the brain. Carisoprodol is the generic version of this painkiller. This Carisoprodol is actually the better version of meprobamate which has the better muscle relaxing qualities, less potential of abuse and overdose. To enjoy the best effect of this medicine, use it with rest and proper treatment. You can get this painkiller from any medical store. If you want to get it at an affordable price, Buy Soma pill 500 mg online.
By soma 500mg, At
January 24, 2020 at 9:52 PM
soma 500mg, At
January 24, 2020 at 9:52 PM
Very much effective tutorial about thermal photo effect. Thanks for sharing this type of informative and helpful post.
We are providing best Clipping Path Service
By Rezu Islam, At
February 21, 2020 at 8:23 AM
Rezu Islam, At
February 21, 2020 at 8:23 AM
We are providing best digital photo editing service.
Clipping Path
Clipping Path Service
By Rezu Islam, At
March 20, 2020 at 8:02 AM
Rezu Islam, At
March 20, 2020 at 8:02 AM
Excellent article! This post is very informative and useful also help me a lot. Thanks for sharing.
Car Pic Editing Service|Deep Etching Service
By Clipping Path De, At
March 20, 2020 at 1:31 PM
Clipping Path De, At
March 20, 2020 at 1:31 PM
Helpful as always. Every post you write produce a massive value to your readers that is the only reason it is so popular and has great authority. Smart Camera
By Smart camera, At
April 3, 2020 at 10:57 AM
Smart camera, At
April 3, 2020 at 10:57 AM
Wow. Amazing. Please keep on posting.Thanks exercise blog
By exercise blog, At
April 3, 2020 at 11:00 AM
exercise blog, At
April 3, 2020 at 11:00 AM
Thank you for sharing this information! I must visit their website. magazine pick
By magazine pick, At
April 3, 2020 at 11:01 AM
magazine pick, At
April 3, 2020 at 11:01 AM
Thanks for sharing such a nice info with us. It’s a great tutorial! I love the way it explains several different tools very clearly. See more
By See more, At
April 3, 2020 at 11:02 AM
See more, At
April 3, 2020 at 11:02 AM
Get Accounting and Bookkeeping service from SmallBusinessAccountant. It 24*7 service for their Customer. If you have any query related accounting and booking as well as need technical assistance for accounting software like QuickBooks and Sage, Contact us.
By Dave Williams, At
April 7, 2020 at 2:51 AM
Dave Williams, At
April 7, 2020 at 2:51 AM
Nice post, here's another interesting one https://virtual-staging.archicgi.com/real-estate-photo-enhancement-photoshop-vs-virtual-staging/
By Mike Masonbridge, At
April 16, 2020 at 3:41 AM
Mike Masonbridge, At
April 16, 2020 at 3:41 AM
Great post, Through this I got a good idea.
Thank you so much for sharing it.
You can know more about photo editing related to it here.
By Clipping Path View, At
May 9, 2020 at 10:36 AM
Clipping Path View, At
May 9, 2020 at 10:36 AM
Great sharing this post. Your post useful for me.
Clipping path Service
Background Removal
shadow creation
Image Editing
Photo Retouching service
By Best Photo Editing, At
May 17, 2020 at 5:58 AM
Best Photo Editing, At
May 17, 2020 at 5:58 AM
You may encounter QuickBooks Error 12002 while updating QuickBooks desktop or payroll. When QuickBooks Desktop is unable to connect with the internet, users may interface with some update issues and QB error 12002 is one of them. Reasons for this problem could be antivirus or firewall protection blocking to launch QuickBooks or payroll updates, improper security settings setup, etc.
QuickBooks Error 12002
QuickBooks update Error 12002
QuickBooks Payroll Update Error 12002
QuickBooks Payroll Error 12002
Error 12002 in QuickBooks
Payroll Error 12002 in QuickBooks
Payroll update Error 12002 in QuickBooks
By Mason Olivia, At
June 1, 2020 at 4:40 AM
Mason Olivia, At
June 1, 2020 at 4:40 AM
Such a great tutorial that is. really awesome work.Just Gorgeous and very creative, I really love this type of work. Thanks a lot for sharing.
Clipping Path | Photo And Image Editing |
By Clipping Path Product, At
June 22, 2020 at 1:01 AM
Clipping Path Product, At
June 22, 2020 at 1:01 AM
I think this quilt is fabulous! Your concept is really exceptional. Good and Special Collection. I’m just finding something like that.. Many thanks.
Clipping Path Product | Clipping Path | Photo And Image Editing | Clipping Mask | Image Masking Services | Ghost Mannequin Services |
By Photo Editing Company, At
June 27, 2020 at 10:30 PM
Photo Editing Company, At
June 27, 2020 at 10:30 PM
informative!
Worried about QuickBooks Support ? if you are not able to fix QuickBooks Problem, get in touch with QuickBooks expert for instant solution.
Dial QuickBooks Support Phone Number Arizona 1-844-908-0801
QuickBooks Support Phone Number Arizona
By thomas, At
June 29, 2020 at 10:50 PM
thomas, At
June 29, 2020 at 10:50 PM
Hi, Very good article on Thermal Photo Effect,
Thanks for sharing, keep up the good work.
Photoshop Clipping Path | Web Images Optimization | Images Background Remove | Natural Drop Shadow | Raster to Vector Conversion | Contact Us
By Imagescutout, At
July 16, 2020 at 10:27 PM
Imagescutout, At
July 16, 2020 at 10:27 PM
Thanks for sharing nice photo effect in photoshop.
By clipping path service provider, At
July 19, 2020 at 1:58 PM
clipping path service provider, At
July 19, 2020 at 1:58 PM
Onfeetnation
Wodemo
Godry
Nouw
By Anonymous, At
July 21, 2020 at 11:51 PM
Anonymous, At
July 21, 2020 at 11:51 PM
Wow. amazing option. never try this before.
By Brenda vinci, At
August 2, 2020 at 11:06 PM
Brenda vinci, At
August 2, 2020 at 11:06 PM
Expert professional inspired and try to improve their skilled as your mentioned tutorial. Thanks a lot.
By clipping path company, At
August 21, 2020 at 12:01 PM
clipping path company, At
August 21, 2020 at 12:01 PM
Great experience, all tutorial step teachable. Thanks for sharing
clipping path service
clipping path service
By V's Little World, At
September 16, 2020 at 12:01 AM
V's Little World, At
September 16, 2020 at 12:01 AM
Thanks for sharing your infomation about Photo Editing
By Imran Khan, At
September 26, 2020 at 8:33 AM
Imran Khan, At
September 26, 2020 at 8:33 AM
Great tutorial! Maybe you used the clipping path service to reduce the noises, right?
By Rafi, At
October 11, 2020 at 11:07 PM
Rafi, At
October 11, 2020 at 11:07 PM
Very nice post. Thank you so much for it from ecommerce photo editing service provider
By Clipping Path View, At
October 17, 2020 at 11:54 PM
Clipping Path View, At
October 17, 2020 at 11:54 PM
Great post
By Swift Deal, At
October 19, 2020 at 3:55 AM
Swift Deal, At
October 19, 2020 at 3:55 AM
So nice and important post.Thank you so much for it from ecommerce photo editing service provider
By Clipping Path View, At
October 19, 2020 at 3:59 AM
Clipping Path View, At
October 19, 2020 at 3:59 AM
Your Effect was Really exceptional. It can be help Our Professional Photo Editing Services
By Photo Editing Center, At
October 19, 2020 at 4:00 AM
Photo Editing Center, At
October 19, 2020 at 4:00 AM
The article is very nice. Really it's a helpful article. Thanks for publishing the article. I have a clipping path editing office. You need any image editing and you want to learn image editing please visit our website.
clippingpathediting.com
By Clipping Path Editing , At
November 4, 2020 at 8:45 AM
Clipping Path Editing , At
November 4, 2020 at 8:45 AM
The article is very nice. Really it's a helpful article. Thanks for publishing the article. I have a clipping path editing office. You need any image editing and you want to learn image editing please visit our website. https://clippingpathediting.com/
By Clipping Path Editing , At
November 4, 2020 at 8:48 AM
Clipping Path Editing , At
November 4, 2020 at 8:48 AM
I am thankful for your helpful post,welcome to ecommerce photo editing service provider
By Clipping Path View, At
November 5, 2020 at 9:05 PM
Clipping Path View, At
November 5, 2020 at 9:05 PM
Great article for photo editing tips. Thanks
By Clipping Path Editing , At
November 8, 2020 at 4:13 AM
Clipping Path Editing , At
November 8, 2020 at 4:13 AM
Thank you for the post. It saves my days!
By David, At
November 12, 2020 at 6:39 AM
David, At
November 12, 2020 at 6:39 AM
Wow this was a very informative tutorial. Thank you for sharing with us.
By David Smith, At
November 25, 2020 at 8:46 PM
David Smith, At
November 25, 2020 at 8:46 PM
All the articles here are informative. It is beneficial to the newcomers. Thanks for posting such a nice post.
Clipping Path Service
By Sazzad Khan Rubel, At
November 28, 2020 at 1:41 PM
Sazzad Khan Rubel, At
November 28, 2020 at 1:41 PM
well done! Great article...
Sage 50 default admin password
Sage 50 Queue dta is in use Error
Sage 50 2019 wont open
Window firewall is blocking QuickBooks 2018 and 2019
Sage 50 Smartposting service stuck in starting
Sagepay 5080 Error form transaction registration failed
Sage 50 invalid directory path
Sage 100 2019 not printing
Find QuickBooks validation code in registry
Find QuickBooks validation code in registry
By Sage 50 and QuickBooks Support, At
December 23, 2020 at 3:09 AM
Sage 50 and QuickBooks Support, At
December 23, 2020 at 3:09 AM
This is really amazing i never seen this effect thanks for sharing. photo retouching services cincinnati available in low price
By sa, At
March 15, 2021 at 6:06 AM
sa, At
March 15, 2021 at 6:06 AM
What a good post it is. Thanks for your post
By Clipping Path, At
March 16, 2021 at 6:51 AM
Clipping Path, At
March 16, 2021 at 6:51 AM
Wow, pretty cool tips. I really appreciate your post. I definitely visit this blog again
Photo Background Removal Service
Image Masking Service
By Background Removal Service, At
March 18, 2021 at 8:26 AM
Background Removal Service, At
March 18, 2021 at 8:26 AM
Amazing i really like it here i am giving this business service check this Cinconize it will make your business look more attractive
By Image Restoration Center, At
March 24, 2021 at 11:43 PM
Image Restoration Center, At
March 24, 2021 at 11:43 PM
Wow, pretty cool tips. I really appreciate your post. I definitely visit this blog again
Background Removal Service
Clipping path Service
White Background Remove
By Background Removal Service, At
March 27, 2021 at 4:07 AM
Background Removal Service, At
March 27, 2021 at 4:07 AM
Marvelous post!!! Your blog is really outstanding. Thanks a lot for sharing such a wonderful post.
Clipping Path Fix | Image Background Removal Service | Image Masking Service | Image Manipulation Service | Photo Retouching Service | Shadow Creation Service | Color Correction Service | Clipping Path Service
By Sazzad Khan Rubel, At
March 31, 2021 at 1:44 PM
Sazzad Khan Rubel, At
March 31, 2021 at 1:44 PM
Wow, pretty cool tips. I really appreciate your post. I definitely visit this blog again
Clipping Image Photoshop
By Cut Out Way, At
April 3, 2021 at 4:01 AM
Cut Out Way, At
April 3, 2021 at 4:01 AM
The errors OLSU-1024 and OLSU-1022 occurs while users try creating bank accounts on the QuickBooks desktop. The error specifies that it occurred while updating the branding files. Our certified QuickBooks Technical support team to resolve QuickBooks Error OLSU-1022 or OLSU-1024 within less timing.
QuickBooks Error Code OLSU-1024 OR OLSU-1022
QuickBooks Error Code OLSU-1024 OR OLSU-1022
By QuickBooks OLSU-1024 and OLSU-1022 Error, At
April 13, 2021 at 2:52 AM
QuickBooks OLSU-1024 and OLSU-1022 Error, At
April 13, 2021 at 2:52 AM
A nice post on Thermal Photo Effect. Thermal Photo Effect makes an image look great simply! Thanks for the post.
How To Set GIF As Wallpaper On Windows 10
By Fix Guider, At
May 7, 2021 at 4:44 PM
Fix Guider, At
May 7, 2021 at 4:44 PM
Banani is one of the most desired locations to live in Dhaka. There are many reasons for which people look for an apartment rent in Banani. To make your renting easy and profitable, Rentsbd is here to help you! Rentsbd will bring the best deal for you.
By Rentsbd, At
May 20, 2021 at 2:15 AM
Rentsbd, At
May 20, 2021 at 2:15 AM
Thank you so much for sharing with us the Photography Guide. It also gives us more experience. So everyone will be very helpful.
Clipping Path
Clipping Path Price
By Background remove, At
June 4, 2021 at 11:30 AM
Background remove, At
June 4, 2021 at 11:30 AM
QuickBooks error 6000 83 is an error that takes place when the client is attempting to get to the QB company file, it gives a message box each time expressing that the document can't be opened or it has been confined for usage. We can solve these types of errors with ease. You can visit us for more assistance. Just click the link above.
By Quickbooks error, At
June 5, 2021 at 9:13 AM
Quickbooks error, At
June 5, 2021 at 9:13 AM
What an excellent post. Keep the best quality content. Learned a lot thank you so much. Clipping Path Service Provider Company
By CPR Graphics Firm, At
June 14, 2021 at 11:12 PM
CPR Graphics Firm, At
June 14, 2021 at 11:12 PM
This comment has been removed by the author.
By CPR Graphics Firm, At
June 16, 2021 at 1:05 AM
CPR Graphics Firm, At
June 16, 2021 at 1:05 AM
Great tutorial on how to convert your photos into Thermal Photo Effects.
Buy Verified Neteller Account
By Verified Account, At
August 18, 2021 at 4:20 AM
Verified Account, At
August 18, 2021 at 4:20 AM
This comment has been removed by the author.
By FixingHacks, At
September 1, 2021 at 12:32 PM
FixingHacks, At
September 1, 2021 at 12:32 PM
Thanks for showing us how to convert photos into Thermal Photo Effects.
Are you one of them asking "what is IoT hidden menu on my Android phone"? Are you wondering what it does and why this menu is available on your Android phone?
Android OS has a hidden IoT menu where you can discover and tweak your phone’s user interface. Known as Easter eggs, they are secret strings of code that are a piece of the OS or applications. Such easter eggs are often hidden and reserved for users to discover by developers.
It was initially an experimental project, but it is now available on any phone. The secret settings are not hard to discover, but most people are unaware that they exist.
You can get to it by dialling *#0*#. You’ll now see a list showing plenty of the choices in the hidden menu that are incredibly exclusive or intriguing.
Many of these options can be accessed in the Settings of your smartphone. Or you can access them by turning on the Developer Mode. Still, this code is a quicker way to do a specific task. The hidden menu is an aid when your phone settings or hardware does not work correctly.
By FixWill, At
September 2, 2021 at 1:52 AM
FixWill, At
September 2, 2021 at 1:52 AM
This tutorial was very useful. i needed thermal effect on my photo. thank you.
Clipping Path Company
By Best Image Clipping Path Service, At
September 20, 2021 at 11:31 PM
Best Image Clipping Path Service, At
September 20, 2021 at 11:31 PM
This comment has been removed by the author.
By CPR Graphics Firm, At
September 27, 2021 at 12:01 AM
CPR Graphics Firm, At
September 27, 2021 at 12:01 AM
You wrote an amazing blog. I really enjoyed it.
Clipping Path Service Provider Company in Dhaka Bangladesh
By Best Image Clipping Path Service, At
October 4, 2021 at 11:58 PM
Best Image Clipping Path Service, At
October 4, 2021 at 11:58 PM
I learn something for your blog.
remove bg car
By Unknown, At
October 26, 2021 at 5:33 AM
Unknown, At
October 26, 2021 at 5:33 AM
Hey, really it's amazing fashion photography blog. I'm inspired to see your blog.
Best Regards,
clipping path service provider
By Yanira Morrison, At
November 1, 2021 at 2:25 AM
Yanira Morrison, At
November 1, 2021 at 2:25 AM
This effect was really famous back in the day. Now its not appreciated by everyone.
By Clipping Path Service, At
December 7, 2021 at 9:08 PM
Clipping Path Service, At
December 7, 2021 at 9:08 PM
Nice tutorial! keep it up.
Best Regards,
image masking service
By Zack Nilsson, At
January 12, 2022 at 10:04 PM
Zack Nilsson, At
January 12, 2022 at 10:04 PM
very informative post!
Best Regards,
how to edit waterfall photos
By Thomas Martin, At
January 18, 2022 at 12:20 AM
Thomas Martin, At
January 18, 2022 at 12:20 AM
Buy Smart TV Now click here Android Smart TV price in Bangladesh M.K
By Unknown, At
February 21, 2022 at 9:07 PM
Unknown, At
February 21, 2022 at 9:07 PM
I loved your photoshop tutorial about this effect. It was very helpful.
By Urban street photographers, At
April 6, 2022 at 2:13 AM
Urban street photographers, At
April 6, 2022 at 2:13 AM
very good and easy photoshop tutorial. well done.
By ecommerce product photo editing, At
April 19, 2022 at 12:57 AM
ecommerce product photo editing, At
April 19, 2022 at 12:57 AM
I am Md Rimon Islam & a professional graphic designer.Business Card Design I love my work & highly dedicated to my profession. I know how to make my design unique. In fiver, I'd like to share my expertise. My target is satisfied by my clients with the latest tools, design trends, and technics. I love to work until my client isn't happy. Design is my passion!! If you have any questions please don't hesitate to contact me.
By Business Card Design, At
April 25, 2022 at 12:18 PM
Business Card Design, At
April 25, 2022 at 12:18 PM
You can easily improve your photo by
photo editing. You should visit us.
By Nancy Brown, At
September 1, 2022 at 3:44 AM
Nancy Brown, At
September 1, 2022 at 3:44 AM
you made this tutorial so easy to understand. I did my first image editing.
By clipping path service provider, At
September 4, 2022 at 11:10 PM
clipping path service provider, At
September 4, 2022 at 11:10 PM
i was don't know clearly about this topics before. i am thankful for your blog post
By Manjur Hussain, At
September 6, 2022 at 3:09 AM
Manjur Hussain, At
September 6, 2022 at 3:09 AM
bike rack for hitch
By MTB-Bikes, At
October 6, 2022 at 4:25 AM
MTB-Bikes, At
October 6, 2022 at 4:25 AM
This comment has been removed by the author.
By Alexis Blog, At
February 14, 2024 at 7:58 PM
Alexis Blog, At
February 14, 2024 at 7:58 PM
GEI Photoshop services are unparalleled in transforming ordinary images into extraordinary masterpieces. Their skilled team of photo editing experts exhibits a remarkable attention to detail, ensuring flawless retouching and enhancement. Trust GEI to elevate your visual content with their exceptional craftsmanship and commitment to perfection.
By Alexis Blog, At
February 14, 2024 at 7:59 PM
Alexis Blog, At
February 14, 2024 at 7:59 PM
Clipping Path Center effortlessly delivers transparent backgrounds in Photoshop CC 2024. Their expertise ensures precision and perfection, transforming images with a seamless and professional touch. Trust them for a standout visual experience!
By Mary Lowman, At
February 28, 2024 at 12:53 AM
Mary Lowman, At
February 28, 2024 at 12:53 AM
Thank you for being a constant source of inspiration.
Visit Here: eCommerce image editing service
By clipping path service, At
March 20, 2024 at 10:13 PM
clipping path service, At
March 20, 2024 at 10:13 PM
Such a great collection of photography quotes! They really capture the essence and creativity behind the lens. For anyone looking to elevate their photo editing game, check out this fantastic Photoshop masking techniques that enhances your images beautifully.
By clipping path center, At
December 4, 2024 at 1:03 AM
clipping path center, At
December 4, 2024 at 1:03 AM
Cool tutorial! The thermal photo effect adds a vibrant, creative twist to any image. For flawless finishing, MyPixeler’s photo editing services are the perfect choice.
By Ronny, At
August 14, 2025 at 9:49 PM
Ronny, At
August 14, 2025 at 9:49 PM
Photo Retouching Ltd is dedicated to transforming your photos into polished, professional, and visually stunning images.
By Anonymous, At
August 15, 2025 at 2:43 AM
Anonymous, At
August 15, 2025 at 2:43 AM
Hi, Very interesting, good job and thanks for sharing such a good blog. your article is so convincing that I never stop myself to say something about it. You’re doing a great job.
Body Retouching Service
Keep it up.
By Pro Photoshop Expert, At
November 2, 2025 at 12:53 AM
Pro Photoshop Expert, At
November 2, 2025 at 12:53 AM
Great post that shows how a major Deep Learning accomplishment works
photoshop services
Thanks
By Photoshop Expert, At
March 5, 2026 at 6:27 AM
Photoshop Expert, At
March 5, 2026 at 6:27 AM
Post a Comment
<< Home