Professional Skin Retouch
Step 1: First open an image. I take this photo from www.flickr.com
Step 2: Duplicate the layer by pressing Ctrl+J and name it 'Layer 1'.
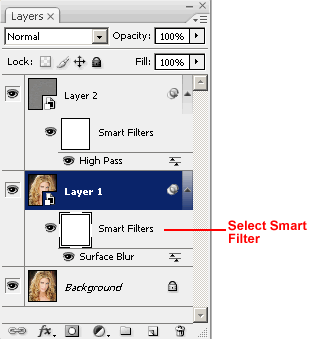
Now right click on the duplicated layer and select Convert to Smart Object.
Duplicate the 'Layer 1' and name it 'Layer 2'.
Step 3: Select the 'Layer 1' and go to Filter> Blur> Surface Blur and apply the following setting:
Step 4: Now select 'Layer 2' and go to Filter> Other> High Pass and set the Radius as 3.0 to 3.5.
The High Pass filter is exactly the opposite of the gaussian blur filter.
Step 5: Set the layer blending mode to 'Soft Light'.
Now your Image looks like:
Step 6: Select the layer mask in the 'Layer 1' Smart Filters.
And go to Image> Apply Image and use the following setting:
Step 7: And finally select 'Layer 2' and set the opacity to '50%'.

10 Comments:
great great tutorial :)
By Anonymous, At
May 7, 2009 at 7:37 AM
This is nice but it worked on white skin. No visible effect on dark skin
By Olugbenga Akhuemonkhan, At
May 20, 2009 at 7:35 AM
nice tutorial It can help me with some retouches of my son's photos.
By Ryan Gliozzo, At
July 7, 2009 at 5:32 AM
Thanks for the tutorial,Try to use adobe photoshop for retouch image procedure.
By Unknown, At
February 22, 2010 at 6:45 AM
Whenever I try to retouch any photo, it take so long...... by the by this is really good :)
By Clipping Path Service, At
March 26, 2015 at 7:19 AM
Really great jon and good tutorial for Skin Retouch.
Clipping path
Image Masking Service
Remove Background service
By Clipping Path, At
May 11, 2016 at 2:43 PM
Nice tutorial for skin touch up and i have learn lots
By white background, At
May 11, 2016 at 2:44 PM
Why don't you post video tutorial? That will be more helpful for the people.
By Robert Smith, At
June 8, 2018 at 9:00 PM
Thanks for the article...this is very good content ..write continue and inform me. If you interested
in clippingpath APT contact our site.
By Durbin, At
April 12, 2021 at 10:10 PM
Excellent guide on professional skin retouching! The techniques are practical and yield natural-looking results. If you're looking to bring the same level of excellence and precision to your visual content, consider checking out Zenith Clipping. Their professional photo editing services can help make your holiday memories truly shine. Keep up the fantastic work! 🌟
By Zenith Clipping, At
February 22, 2025 at 3:54 AM
Post a Comment
<< Home