Christmas Bells
Today's I am going to show you how to create Christmas Bells.
(1) The hardest part of this tutorial is creating the bell shape. I used the Pen tool for this and converted my path to a selection. I then created a new layer named BELL and filled it with any color.

(2) Select the Gradient Tool. Then, click on the gradient preview in the options bar to open the Gradient Editor dialog box. Once there, create a gradient similar to this reference image.

(3) Cltr + click on the BELL layer to put a selection around the bell shape.
Select the Linear Gradient Tool and choose your new gradient. Then drag from left to right across the bell as I have portrayed in this reference image.

(4) Create a new layer above the BELL layer named INNER BELL.
(5) Using the elliptical marquee tool, draw an oval that is almost as wide as the bell shape and 1/10 of the height.

(6) Fill this oval selection with the same gradient but reverse the direction in which you drag.

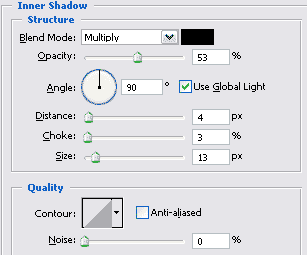
(7) Double click the INNER BELL layer to display the Layer Styles dialog box. Choose Stroke and make your settings similar to the first reference image. Then add an inner shadow layer style similar to the next reference image.


(8) Next, we need the small ball shape inside of a bell. This is the part that makes all of the noise (and coincidentally, the part that I remove before giving the bell to my toddler son when we put up our Christmas tree - can you say headache?). Create a new layer below BELL and call it BALL. Using the elliptical marquee tool, create a circle and fill it with the same gradient that we have been using but choose the radial gradient option instead of the linear one.

(9) Ctrl + Click on the INNER BELL layer to put a selection around the oval shape.
Choose Select > Inverse. Make the Ball layer that you just created with the radial gradient active and hit delete.

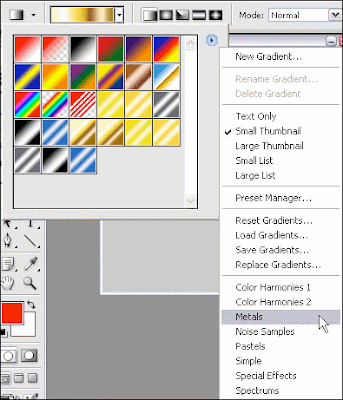
(10) Finally, we need to add a hook holder thingee (not really sure what they call them) at the top. I used the rounded rectangle tool for this by creating a rounded rectangle shape behind the BELL layer. I then added a gradient to it by choosing Metals from the Gradient flyout menu and applying the Silver gradient.


(1) The hardest part of this tutorial is creating the bell shape. I used the Pen tool for this and converted my path to a selection. I then created a new layer named BELL and filled it with any color.

(2) Select the Gradient Tool. Then, click on the gradient preview in the options bar to open the Gradient Editor dialog box. Once there, create a gradient similar to this reference image.

(3) Cltr + click on the BELL layer to put a selection around the bell shape.
Select the Linear Gradient Tool and choose your new gradient. Then drag from left to right across the bell as I have portrayed in this reference image.

(4) Create a new layer above the BELL layer named INNER BELL.
(5) Using the elliptical marquee tool, draw an oval that is almost as wide as the bell shape and 1/10 of the height.

(6) Fill this oval selection with the same gradient but reverse the direction in which you drag.

(7) Double click the INNER BELL layer to display the Layer Styles dialog box. Choose Stroke and make your settings similar to the first reference image. Then add an inner shadow layer style similar to the next reference image.


(8) Next, we need the small ball shape inside of a bell. This is the part that makes all of the noise (and coincidentally, the part that I remove before giving the bell to my toddler son when we put up our Christmas tree - can you say headache?). Create a new layer below BELL and call it BALL. Using the elliptical marquee tool, create a circle and fill it with the same gradient that we have been using but choose the radial gradient option instead of the linear one.

(9) Ctrl + Click on the INNER BELL layer to put a selection around the oval shape.
Choose Select > Inverse. Make the Ball layer that you just created with the radial gradient active and hit delete.

(10) Finally, we need to add a hook holder thingee (not really sure what they call them) at the top. I used the rounded rectangle tool for this by creating a rounded rectangle shape behind the BELL layer. I then added a gradient to it by choosing Metals from the Gradient flyout menu and applying the Silver gradient.


5 Comments:
super
By Anonymous, At
July 14, 2010 at 12:30 PM
wonderful creation of Christmas Bells and lovely tutorials
Remove White Background
By Clipping Path, At
May 11, 2016 at 3:00 PM
it's very helful tutorial, thank you so much.
By Clipping Path service, At
October 18, 2016 at 2:49 AM
Amazing photographs! These pictures are wonderful!
http://clippingexpertasia.com/clipping-path-service/
By Clipping Path, At
May 7, 2017 at 4:58 AM
Your post about "Christmas Bells". This is really good and very informative post for Christmas Bells. Thanks to share this kinds of post with us.
clipping path service company
By Olivia O. Harris, At
May 31, 2017 at 3:11 AM
Post a Comment
<< Home