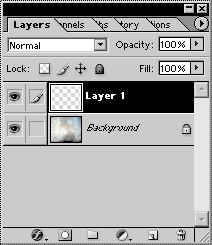
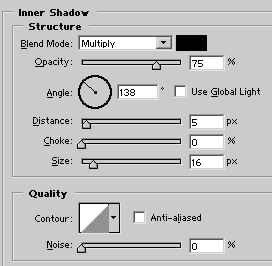
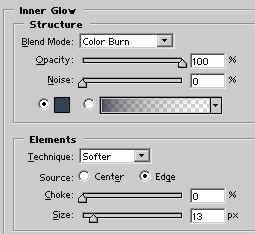
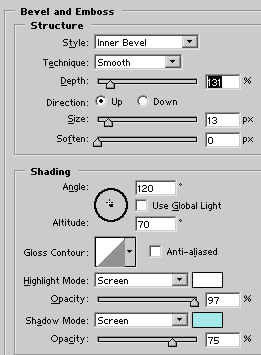
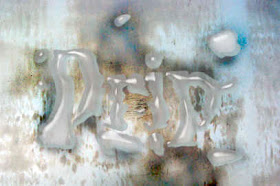
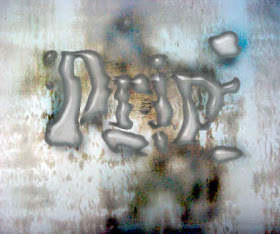
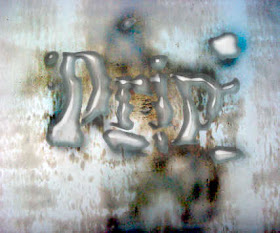
1) To start, find a picture to serve as a background. For this example I am using a sheet of metal, but concrete would work nicely also.
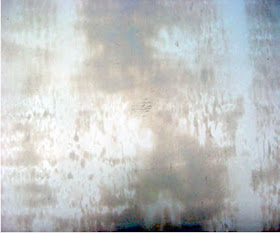
![](https://blogger.googleusercontent.com/img/b/R29vZ2xl/AVvXsEg5Y6CLY0TvciiW4NNVqejdj9Ddj9JmAG7GgLzovXr4NjWSWqmoymrsvOhS7YJYXfuebbhxL_jz3GP_j1_FsTDCTn-dI82bt-ORnMOp7hLno4o1CJz2IvZTTxCSW9PpExRswDHaX6U8tD7b/s280/Untitled-1.jpg)
2) Create a new layer.
![](https://blogger.googleusercontent.com/img/b/R29vZ2xl/AVvXsEjek4sngE1TK6Ey91Apq9oRmtIXOYY38yJDhlrc63m9nDiJpxMD24SdCdDVsbzaGPHcGF6zujyeHUG1ThsxYBKPAVeFJOplSf4JiPXs38sQWkCsqkGnffP6lsBo9v-j-86nj1cQoshP_Mt6/s400/Untitled-2.jpg)
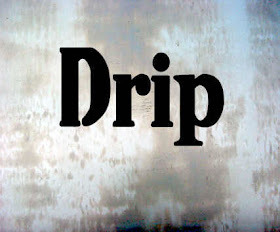
3) Select the Type Mask Tool. Type your selection in the new layer.
Fill the selection with Black, and deselect.
![](https://blogger.googleusercontent.com/img/b/R29vZ2xl/AVvXsEiSvdvJQqZ2B-z4vdUfkPciuSzUipcavagTIxPsn735t_vf9Qc2fv2FkNKuWMRvORKVNV_ivtDXPjc3A7JQFRXKKdqr16pZlPwWmwK1CUmspOCAsVzR7cfUSAxEBizSy8CDYgUtNNSetoqx/s280/Untitled-3.jpg)
4) Select the Paint Brush tool. Use settings similar to those in the capture below.
![](https://blogger.googleusercontent.com/img/b/R29vZ2xl/AVvXsEgHaizh1KXAXBeoFvusS9oGs1acP_hbECIE_6GVmLkSz9w2pTOoK8amkXvMs9RkKfj0A7DF2Dk0VgcupuHSXfCy6CH7607LhZyJpDxKWUBb0_WgEpKyRqg6Li4euk1pxYw9ZWcm4SnGrLfW/s280/Untitled-4.jpg)
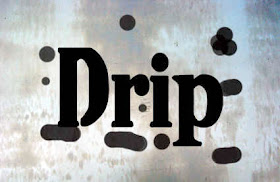
5) Paint a few spots around the text.
![](https://blogger.googleusercontent.com/img/b/R29vZ2xl/AVvXsEgPWJYahtm2NT2sl7Pd7M1pH9BZZ1aREYaWDykFoGBQDVvIo5ddSjnkYizNkimixCu6p3sBIpGVk0nJpZupqhWFGysfmnDhkUDHV4M9HYWSdE3otRqIkL8N5XYsw6itJPpunGR9TJlVsqLP/s280/Untitled-5.jpg)
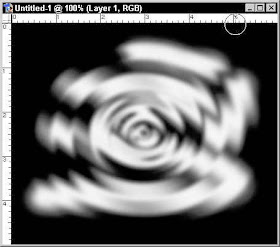
6) This part is fairly important. Minimize the current image, and create a new image with the same dimensions. Fill it with black. Paint some wide, white swaths through the black using a fat, feathered brush. Go to Filter>Distort>Twirl and twirl the image with a setting of 100 or so. Then go to Filter>Distort>ZigZag, choose out from center, and add some ripples. Try to get an image
close to the one seen here:
![](https://blogger.googleusercontent.com/img/b/R29vZ2xl/AVvXsEhpb3QOBbTACmZUeQZnO2-IvNPrLRxvFw11_RkbKR6-pCMBdnyKOi9DYa2VFsmoA1mzje_w7Q6tycFgbKJd_jRhyxaEXArOLIRQfAuDZ7N0T1x9_8jWlvJFHRZ6ZYcKN4W6UATQ7zjcQt0A/s280/Untitled-6.jpg)
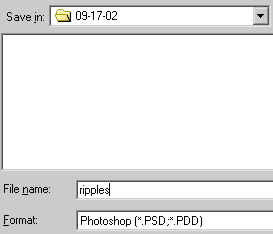
Save this image as a .psd file somewhere on your computer. If you are familiar with displacement maps, then you know where I’m going with this.
![](https://blogger.googleusercontent.com/img/b/R29vZ2xl/AVvXsEjlc2PkebEqDNPM3wybY6hyphenhyphencwSD9Ha56QKXjmnP1qOhMxsZAA9RHAnGP_DOhfeBEeamxJ__gxREnuTKjJCH6m5YVj6IFlcXfrzCiOwDQ1BPsD1zJe62esmzLBs75e8ISg2AxogVpcLYxt7p/s400/Untitled-7.jpg)
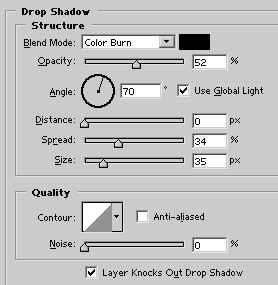
7) Go back to you original image and select the text layer. We are going to apply a few settings using the Layer Styles dialog box, so click the ‘Add a Style’ icon on the bottom of the layers palette. Let’s start with a Drop Shadow:
![](https://blogger.googleusercontent.com/img/b/R29vZ2xl/AVvXsEiN6a2vcyp4ID5dExQwFZTGHBkuaAtIzJy4yTf5afed7Cze34oLXnF4k70cDLlSAxdHqhKETqnDlBmre6_3Bctu5EZYiAPPlyMhxFI1-c2OnXL4HLX6EBLBHnlf2lAex2eenC6IWYZuFtkn/s400/Untitled-8.jpg)
Inner Shadow:
![](https://blogger.googleusercontent.com/img/b/R29vZ2xl/AVvXsEiF6o7tO8TWQw3TgA2t59AjdT5sZfecvpnMG6Gzii1OUHp4aIUI5NELV2P3qY8ozjY-lkZN9GBY6d5lTZ6fBLH4MSEKbYWpnH3PbM6gjMBGahlNFm29W25UuQeDPxSLGJSd3fO1zZ24GTEt/s400/Untitled-9.jpg)
Inner Glow:
![](https://blogger.googleusercontent.com/img/b/R29vZ2xl/AVvXsEjXo931x_NvUWlyjZsdW_3QeH9cEfssW2qu-cCcU5SFhzuuOHzJeIy3BfHfucit4ZDvGdnDQBqboFv8_VED_uR2ayCRwULPAeJstxBJF1G3s5Gy_n5FJ79wWNlgeitcR89wL1JAhjhIC9WQ/s400/Untitled-10.jpg)
Bevel/Emboss:
![](https://blogger.googleusercontent.com/img/b/R29vZ2xl/AVvXsEg5KNc7ynuYfMjkQpqK6gdJeK8YrOpa4IZvykn1T-HKb_AXcET09lMfdxuZDxyBJumRICriTJpsVcx-v4DNpS1shR1IFIMP_4-Ak9onKS4pLilEyZ_cwm8UTJCiZWKfOLmLiwPDsz1BzrLk/s400/Untitled-11.jpg)
Color Overlay:
![](https://blogger.googleusercontent.com/img/b/R29vZ2xl/AVvXsEj26_X5k7j87Xc9HyFF4SuoUZoEUt5ettuQNvnEFphrDP0F0tlyfnrJW8fHHjMccPKejmN9XjXEX_QtipSGM5mPYV0Gm6YhI_TG-pZnmv808bg1uZYti8Z0DnCzL8oXzWc3yYcozikBpZ6e/s280/Untitled-12.jpg)
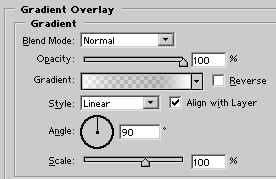
Finally, a gradient overlay:
![](https://blogger.googleusercontent.com/img/b/R29vZ2xl/AVvXsEj2YrbWYFRFDXeTTYCOAhOQPZLU07jniZi7I7LzJccfZjrMi3rHdxITgC2uDAoPRM2EOsALXMJT3_8-J-p0Dtn0FsM5wTspskVWXrUGGHslc9N6wL2_YFFMSw9xvePoeJAx_FGqxjUMWhyu/s400/Untitled-13.jpg)
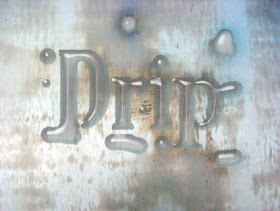
Here we are:
![](https://blogger.googleusercontent.com/img/b/R29vZ2xl/AVvXsEjN-v6XfTfeZoraDhVKEduWDdqCtDswFzQFc_SfScMeLpjyciifQ4vFqr2Udgat4gUQy6yVbeF2xBuc-xnyTU3AsT4K7RF1NhOK_g-EVuwZltw2H8RekQ0rgRBvjBD0H420jYMp79MtY32U/s280/Untitled-14.jpg)
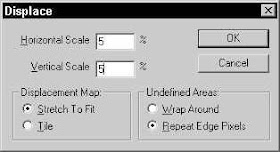
8) Now go to Filter>Distort>Displace, with the settings below.
![](https://blogger.googleusercontent.com/img/b/R29vZ2xl/AVvXsEgzWqwdtzx2u1Wr0eVTtVmx7OBwK_OcGY2OLVgXLere1xZsHSOgjNM11yU1aiHU2s2N2sHODkp31roUi_CaPOSH9eBKg5nbVVxaJHjmtBxhV0G0iK3h6dSAwavkHsvx8MOn0WmvtuEdm1Su/s280/Untitled-15.jpg)
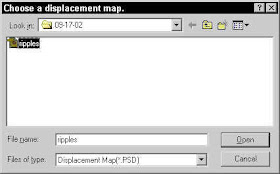
Load the displacement map you created before.
![](https://blogger.googleusercontent.com/img/b/R29vZ2xl/AVvXsEgDKn3F4PLEUFZIbsXIzoHVzmQCsPKCnffJqIm2dq4GSn78q5-EXtINRS28E_cLkEesyx0E5sSb1KGp8k4fPqaSCuZs1CuQkZHf8Nei7KvtCrgbRK1GbF9pjQTqnHZLrUEM7Odh7aNkSH6D/s280/Untitled-16.jpg)
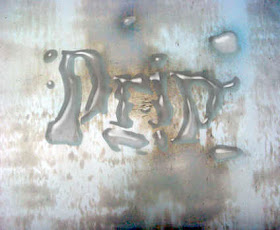
Here’s:
![](https://blogger.googleusercontent.com/img/b/R29vZ2xl/AVvXsEhuAaVbf26u5iuQTj3nX-YKzqfETbrS95fNgw1ML0qMfZjUMcTUyxjdAyz8Qc1mbgBvXkMplD3IJe7f3Yavb6w-XMalG1ev-j8RcD8B9pfdtHPBH3sGXLD4QDvMBBd3DIYc_xOUBkr86qUm/s280/Untitled-17.jpg)
9) Let’s work on that background a bit. As the type is wet, we need to darken the area around the splash marks a bit. The Burn tool will help out nicely. Click the background layer and select the burn tool.
![](https://blogger.googleusercontent.com/img/b/R29vZ2xl/AVvXsEiFejI9SaiJpNiMLGNJ00EbgVzH_U3E_-60BhElVbT_VGBsu0yTaUw2pHhovsfHVdyDmG8Va6TZFwGIY1cCrqWaAOz1_Agxium4qwy2nVp91MgN2jlVjxJzMKbEpIDr1uOFrIwpgxYbmMLP/s400/Untitled-18.jpg)
Set the tool up with the following settings in the options bar:
![](https://blogger.googleusercontent.com/img/b/R29vZ2xl/AVvXsEjkF3zEBQ2Gu47L_DKurzI6SOcZbYMWdu1sgjzbAFVGq0GpsGyGBK3deBgyUrOjZ2mSB9lEjQox57HAdOA8kDeLJLjBvyFVIlgvWSo_0P5u4ehWOcmehw0DDEZgj2nBM2KEAzNbnnhiUNYl/s280/Untitled-19.jpg)
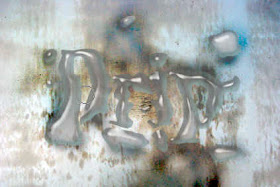
10) Using the burn tool, darken the shadows around the type and water spots.
![](https://blogger.googleusercontent.com/img/b/R29vZ2xl/AVvXsEj4Ih-tsZW9VbOVJh-kZOXpexMV0N5HcVWta7ISIz1UWjicxES3-i4LW1vegMqezxOqtqPvXYcEyOahSuaHJGYKexVtbtv9iijpCSrPUXEmTUuPUXM5Hays2vQa-_zBcbxesdWtFO8nX9TR/s280/Untitled-20.jpg)
11) Create a new layer.
![](https://blogger.googleusercontent.com/img/b/R29vZ2xl/AVvXsEjunWo4oeiDgUzd2_sNgBpIJd2EnEJD5vV_8AGYkdz506Fd1pbIGhYIyPZoQKLyQ-miv_NEwXfNOG7PkShmVKTPwWPCuRYCafou4WuYI5edOLJUcJq4uEfHZ-gwEuybI_l-oBpS86tlkhiz/s400/Untitled-21.jpg)
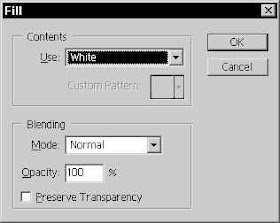
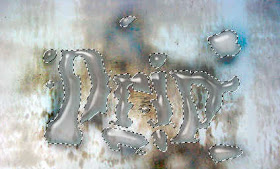
12) Cmd/CTRL+Click the type layer to bring up a selection. Fill the selection on the new layer with white.
![](https://blogger.googleusercontent.com/img/b/R29vZ2xl/AVvXsEj2a5REDE5ss5E_6eLubD2VLwkt5V7U0yxMjdYlu8_-WxL-XyY_JgQKkKy64lzhb7rKbV6cSxe4W6zDB5oY8GeNOtMxxFRKsOpfrIpiIa0sh5n8CQVz8AO-v2YHg_GnUzjffd3r5FZDspRv/s280/Untitled-22.jpg)
![](https://blogger.googleusercontent.com/img/b/R29vZ2xl/AVvXsEjy06cSiiDyVKC0l3KF3tGEXui6SRFJ7yDRe5Dn4wZZXE8kqTDyAcXvtbhjN781bkQrgZd6Az51YhoJcv7upjt4l0_3kzdpO2j96MgxDWX1JOgZnE1c1JaNEhHiimtbqaZcaXeI_8U5MJuZ/s280/Untitled-23.jpg)
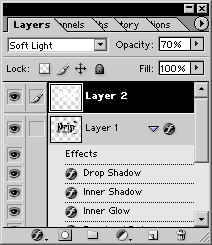
13) Set the Blending mode for this layer to Soft Light, and the Opacity to 70%.
![](https://blogger.googleusercontent.com/img/b/R29vZ2xl/AVvXsEjt6oPG4DB1Ey1LgFgcAtGoL7Db4Ko6Zlbs2GiqDM1r3hB8ahOvMRPP53oaOa9Qo97Q4YVSZOskPHDYqUMzXfYpv_aGihv-G9JB-to3YxyyA-iVSrx-hzHPmjbV_QiV36PcstUAaV9KjuYD/s400/Untitled-24.jpg)
![](https://blogger.googleusercontent.com/img/b/R29vZ2xl/AVvXsEgXYdpes94o1cxfP7Y64ISRrh72JOdCTxrXr4hMb767ylxiVZZUCNQhfTjNj8KWXTlobik_USB0Zk8Lhhf0C67NV0PKyTBNx-NQjhDSUNuuKO_iNZ-58kOe_M_c69Op5UnokdUOeme1hg3G/s280/Untitled-25.jpg)
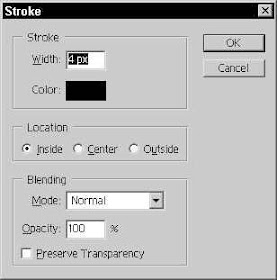
14) Create a new layer. With the selection still active, hit D to reset the default colors (Black=Foreground, White=Background) Go to Edit>Stroke, and stroke the INSIDE of the selection by 4 pixels or so.
![](https://blogger.googleusercontent.com/img/b/R29vZ2xl/AVvXsEiCtYoqpq2W4gEOX9LdPnGCCi8zrIXaxf3MtOgaflUOImJKRABFViRweaLlzibsGFRvWh0jtr0N8g20QmjW9muQUM3Nn6K01Ldf_IacnGZpB5feh4mq_kUcjbHXK-ev_TSUIHNyzs2W5t3n/s280/Untitled-26.jpg)
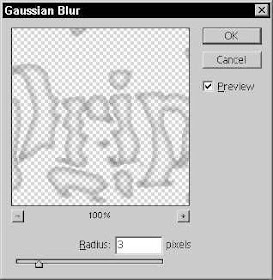
15) Go to Filter>Blur>Gaussian Blur and apply one with a setting of 3 or so.
![](https://blogger.googleusercontent.com/img/b/R29vZ2xl/AVvXsEimr7b3JBJYUDma_AJfDlxJNt2jWCwz-IghJKgwZo9LacGi7y2zBnedxj1EaoOFXJNvjrofExL42kqA22OHFMq6BnMlZiT8AqMMlt4S38iRxTW2VGLGeUy41-ltBgQdkW1uvN1MKPk4bHKl/s280/Untitled-27.jpg)
![](https://blogger.googleusercontent.com/img/b/R29vZ2xl/AVvXsEhM64oIU6zAHOtKwzvIpi7S2l1p_wZBCj_0y4prr70QfS523rgDDgek4sAxgLsWHCJcEcq71DkgzkPrp2LSxlK36tIYsLR1Xx5-5VWHgp7L084_xBOytaYnRecb1SO5Qh-Bvxn9wNrHaLAb/s280/Untitled-28.jpg)
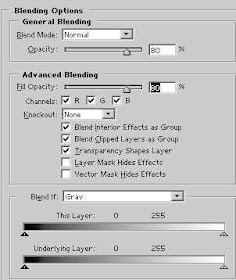
16) Let’s work on the transparency of the image just a bit. Select the type layer, and open the Layer Styles dialog box again. At the top, click on Blending Options. Try applying the following settings:
![](https://blogger.googleusercontent.com/img/b/R29vZ2xl/AVvXsEiDeDsZdy4SdNSc0bFIFP1YhOnmsYftEbMQU20iIhhaegSskq1fkRO5x3Oj0L8eQKPExqvtzOjfA-MvIPpTRiM0uqg1haEeN2oB75OMqwUOfXZIJi916Rj7knNyvXxbPgISZ_kIsWnaj0gh/s280/Untitled-29.jpg)
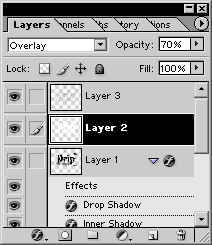
17) Now select the white layer just above the type. Change the Blending Mode to Overlay to see if this helps:
![](https://blogger.googleusercontent.com/img/b/R29vZ2xl/AVvXsEjMaT-NdPTiI-BvxpVTrwYkyhvL2twO39aNx7sjYNMQnn7LmdxBrfTSr6uF2Rl1UvoSNzmKsDjLNVZU4l8VJsvJCtiusy96tjWxXN-wzlpkmMiydtuioW45MwwbqO3unHMmI_uXi0qusjPI/s400/Untitled-30.jpg)
Final
![](https://blogger.googleusercontent.com/img/b/R29vZ2xl/AVvXsEiUH6brhyphenhyphen-0hmJTwqggg2edhFJqNW5ewHEAvHPZRwJzsGCJTQyuKruf3RwJQ6DZXdP5WShw-prXZTZirec71mLXKtGxxGgzrui5M8ig_re7gD-u9hPfo3cJWrOr_msE23zj8tHZ8X1ejfkH/s280/Untitled-31.jpg)
No comments:
Post a Comment